Sunday, 31 October 2010

Fish Finger Sandwich

This is yet another new product in the Sainsbury's Basics range. I don't ever remember Sainsbury's ever including a cheese spread in any of their lines, although in my times at university I remembered using Primula ham and cheese spread to go with bread for breakfast. It was a reminder of the Kerrygold Ham and Cheese spread that I was so fond of when I was growing up.

Had this been around when I was studying, I would most certainly foregone any benefits in taste and bought this. At 42p I could easily buy three of these and my total spend would still be lower than if I were to buy one tube of Dairylea.

For the fish finger sandwich that I will have for lunch today, I decided to make an analogue to tartar sauce by combining the cheese spread with some Basics French dressing, with some interesting results.


The assembly of the rest of the sandwich is pretty straightforward: one slice of bread, some Basics cheddar cheese, 3 fish fingers and then the tartar sauce.


It might be a good idea to bake the 3 fish fingers in a way such that as little of the fingers are in contact with the baking tray. The fingers have a tendency to stick to the foil owing to the oil that seeps out during cooking.

The sandwich was enjoyable, even without the tang of tartar: any excuse to replace an ingredient with cheese would after all be welcome. While the cheese spread was not that strong tasting as promised by the packaging, it would serve as a good substitute for the mayonnaise in mayo-based sauces.
DescriptionPrice per UnitNo. of servingsTrade-up PremiumTrade-up Benefits
Cheese Spread£0.42150g+£0.63 for DairyleaBetter tasting cheese spread. Skip both and go for cream cheese.

Saturday, 16 October 2010

Beef in a Bag

So it appears that another item in the Sainsbury's range has been demoted from the regular in-house range to Sainsbury's Basics. After the Grated Hard Cheese, the other product I have spotted to have had the chop is the pitted olives (both black and green). When the recession hit hardest, Sainsbury's actually reported a spike in sales of its Basics range, so one could speculate that they are rebranding several of their own-brand products in a bid to get customers who identify with Sainsbury's Basics to purchase them.


For today, I decided to grab the olives and some Basics Diced Beef. I would then add some mushrooms to the mix, and then use a method I learnt from Jamie Oliver to cook it in the oven. It basically involves making a foil bag to put the ingredients in, before popping the lot in the oven. It also makes for convenient meals as well as the bags can be prepared in advance and frozen for future meals.

So we start by slicing up some garlic, the olives and mushrooms.


On a 30cm by 30cm sheet of foil, place the ingredients in the centre and season with black pepper. Fold the sheet in half, and then fold each side twice towards the centre, creating a bag. See the second picture down from this sentence to have a rough idea of how it should be done.


Pop into the oven and bake at 225 degrees Celsius until done.


This was a very effective way of cooking the Basics Diced Beef, well known for its toughness and hence the need to resort to slow cooking methods. The mushrooms also provided the liquid which could be used to further stew the beef. I suppose I am now looking forward to baking the second bag of beef that I also prepared in the same session, some time in the future.

DescriptionPrice per UnitNo. of servingsTrade-up PremiumTrade-up Benefits
Black Pitted Olives in Oil£0.9990g+£1.20 for 180gDifferent methods of dressing and styles.

Saturday, 9 October 2010

Cheddar and Bell Pepper Strata

While it seems that bread and butter pudding never really caught on in the United States, a savoury version of this did. I came across the idea of a strata while searching for recipes to use up the remainder of the cheddar cheese from previous posts. Somewhere between a bread pudding and a quiche, the dish calls for the layering of buttered bread slices with other ingredients to form strata, with the assembly flooded with milk and eggs.

The recipe I have decided to use today came from Epicurious, and allowed me to conveniently use not just my cheese, but the rest of my milk and the Basics mustard that has been living in my fridge for months. I also realise that I have not really paid attention to any vegetarians amongst my readers, so consider this my olive branch to you.

This time round I used Basics pitta bread over white sliced bread, the former having fewer pittas than the sliced loaf has slices. This is good as I am not planning to be home over the next week, and Basics bread products usually spoil very quickly.

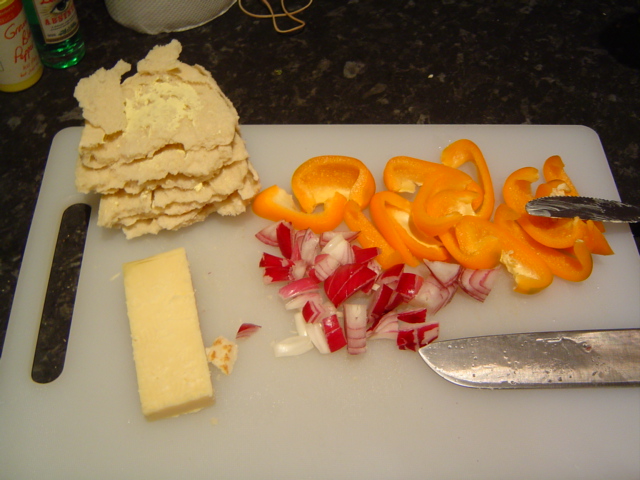
Butter the bread, slice up a Basics bell pepper and an onion, and grate or cut some cheese into thin slices.


Start layering the strata. Begin with half of the buttered bread, followed by a layer of cheese.


Fry the onions and peppers. Use this as a third layer for the strata. Repeat the layering process with the rest of the ingredients, layered in the same order.


Prepare the egg and milk mixture. Beat an egg into about 3/4 cups of milk, and add a teaspoon of Basics mustard. Season with pepper and herb mix, and then pour into


Bake in the oven at 175 degrees Celsius for about 30-45 minutes. You want to see the strata set at the centre and lightly browned on top.

The comments on the Epicurious recipe generally recommend leaving the strata to rest for at least 6 hours before baking. While it might help, I don't think it is absolutely necessary. Overall however, this was good, filling, and cheap. Most of the ingredients are readily available in a student's larder, with the possible exception of the bell peppers and mustard.

I realise that I have been focussing quite a bit on American dishes of late. Hopefully the next post would see me return to my familiar pattern of looking at the UK or my hometown.

Friday, 1 October 2010

Beer Cheese Soup

If there is anything I have learnt while spending four years studying at an university in the UK, it is that there are two items that are vital to the kitchen of any student, and they are cheese and beer. Cheese can be bought cheaply, lasts long, and is filling. Beer largely has the same attributes, is an integral part of British culture, and also has the added advantage of providing some form of relaxation or distraction from the more annoying aspects of student life, notably, studying.

So I find it surprising that up till now, nobody I know has tried to incorporate the two together in food. A recent discovery while reading through the Everything Meals on a Budget Cookbook turned up an interesting idea: Beer Cheese Soup. Further searches on Google revealed that this is actually quite popular in Wisconsin, the biggest producer of cheddar cheese in the United States. There is also a Youtube video which shows food journalist Anthony Bourdain sampling the fare at a local restaurant and discussing the dish.

Unlike the premium ingredients used in the video however, we are going to use humbler and more affordable ingredients. Previous posts on this blog have already introduced the Sainsbury's Basics full-flavour cheddar cheese and middle bacon, so today's new ingredient is, for better or worse, Sainsbury's Basics Lager. Surprisingly, I do not know any student who actually has had to resort to drinking this. I suppose it is a matter of priorities; students would prefer to scrimp on their food budgets so that they can afford better quality beer. A taste test by my flatmate and I quickly revealed why, and it seems that a BeerAdvocate user agrees with our observations, the beer striking us most as coloured water.


The recipe on which I based my post on can be found here. I have deviated a bit from it, mostly to conserve on the amount of fat used and to compensate for the lack of ingredients in my kitchen. Start by frying the bacon until crisp, and then using the drippings from the bacon to fry some chopped celery and carrot. If you become uncomfortable about the amount of fat that is coming from the bacon, feel free to remove them from the wok and use the oven to take care of the rest of the cooking.


Add flour to the vegetables to make a roux. Pour in half of the beer from the can, and add a chicken stock cube.


Add some milk, and slowly stir in the cheese until the soup is thick and smooth. Add the beer and stir for a while. Serve with bacon for garnish.


Anthony Bourdain was told that Beer Cheese Soup found its way into Wisconsin cuisine since it provided nourishment to the people coping with the cold harsh winters common to the region, and I could not agree more. This would provide some comfort at meal times as the weather in the UK starts to take a turn for the worse. As it is, the soup is cheap to procure, but if you want to further reduce costs, you can substitute the middle bacon with Sainsbury's Basics Cooking Bacon and the cheddar with the Basics Grated Mild Hard Cheese, both of which have a significantly lower cost per unit quantity than the ingredients they replace.

DescriptionPrice per UnitNo. of servingsTrade-up PremiumTrade-up Benefits
Lager£0.924+£VariableMany.

Sunday, 19 September 2010

Bacon Cheese Pizza

Sainsbury's recently lowered the price of their Basics mozzarella cheese balls to 30p, just in time for the start of the academic year. I had made a batch of bread dough earlier on in the week for bread to supplement my dinner, so I took the opportunity to make a pizza with the remainder of my dough, the leftover Basics pasta sauce I have, and the now-cheaper mozzarella cheese ball.

In recent times I have started craving for bacon, and while surfing the Net for related articles I suddenly recall the streaky bacon that I am so used to back home but have forgotten, having gotten used to back bacon being the norm here in the UK. The closest thing that the Basics range have are the middle bacon rashers, and not having tried these before and being informed by Wikipedia that these are a cross between streaky and back bacon, I thought I would give these a try.


As you can tell from the picture on the right, the rasher is made of two parts, the medallion hanging off which is usually part of the back bacon, and the rest of it, which you would usually find in streaky bacon. The only problem that I have with this is that they are expensive, at £1.99 for a 450g pack. By comparison, although not exactly the same class of product, a 670g pack of Basics cooking bacon will go for £1.52, although in exchange for a lower price you would end up with part rashers and a variety of other loose cuts of either streaky, back or middle bacon.

I'm hungry, so let's proceed. Take out your bread dough and lay it flat on a sheet of foil, which has been dusted with floor or spread with some oil, so that the dough will not stick while baking. Leave for 25 mins.
Add the toppings. Start with the pasta sauce, then the cheese, then whatever you wish to add to the pizza. Finish with Basics herb mix.


Cook in the oven at 225 degrees Celsius for about 30 minutes.

The only problem with this pizza was the pasta sauce, which we know all along to be rather inadequate. It also might have been a good idea to bake the base first partially before laying on the ingredients. Overall however, the fundamentals of this recipe are sound, and merit another attempt in future.


Description
Price per UnitNo. of servingsTrade-up PremiumTrade-up Benefits
Middle Bacon£1.99450g+£0.01 for 225gStreaky bacon instead of middle bacon

Saturday, 18 September 2010

Corned Beef Stir-Fry

Complications at work, general lethargy and a newfound fondness for the computer game Alien Swarm have delayed the delivery of this post. To make up for it however, I have a few ideas in my mind that would cater to university students, British and overseas alike.

I remembered having a fondness for corned beef (what the Americans call minced corned beef, the kind sold in cans) as a child, especially its strong salty flavours. My mother however was rightfully worried about its high sodium content, and so served it sparingly. Whenever she did, it was always fried together with cabbage, and served with bread. As we grew older however, I did not crave for it as much, gradually forgetting about it altogether. The first time I encountered this again was when I had the New York Deli sandwich at EAT, albeit in the form of pastrami. It got me thinking again about corned beef, and given how it has been associated with British Army field rations, I thought it might be quite interesting to do a post about it.


The Basics Corned Beef slices are rather simple, and don't merit much description. They do keep pretty well even after opening the packet, so long as the packet is wrapped in cling film shortly after. So far, I've only seen the British use this in corned beef sandwiches, and the most they've gotten to cooking it is to stew it with potatoes, according to Wikipedia. For this post, I've decided to recall how my mother used to do it, and stir-fry it with Sainsbury's Basics Vegetable Stir Fry, in the absence of Basics Cabbage from my local supermarket.

So start by heating up a pan on medium-high heat on the stove. While that is going on, break up two slices of the corned beef. Do not worry about the slices burning, there is enough fat and water in the beef to prevent that from happening.

Your hash should end up looking like this:


Add Sainsbury's Basics Vegetable Stir-Fry, and cook until vegetables have shrunk a little and a little gravy has formed.
This was a cheap, tasty and filling meal: the relatively mild taste of the Basics vegetable stir-fry went very well with the strong flavours of the corned beef. It would have been even cheaper had I used the canned corned beef, but that has to be used all in one go, and will not be so convenient to keep in the fridge. The cost of this meal came up to about 68p (43p for 2 slices of corned beef and 25p for quarter pack of vegetables), excluding some bread or rice for staple, which itself should be quite cheap. This post would be just in time for the start of the Fall term at my alma mater, where the incoming batch of international students may find this useful, as they spend the first few weeks familiarising themselves with the local Sainsbury's, living on their own, and the UK in general.


Description
Price per UnitNo. of servingsTrade-up PremiumTrade-up Benefits
Corned Beef Slices£1.708 slices+£0.89 for 200gBetter quality meat?

Tuesday, 31 August 2010

Pepperoni Pizza

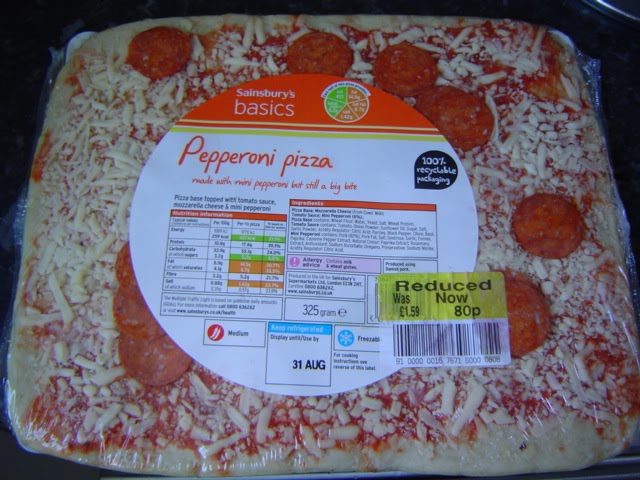
I am a bit tired of cooking today, so I decided to just pick something up from Sainsbury's to pop into the oven or microwave. Something compelled me however to do a mini-post on the Basics Pepperoni Pizza that you can find in the fresh pizza counter at Sainsbury's.

These have been around for about a year or so now, but I've never really thought of reviewing this; when it was first introduced, the amount of pepperoni and cheese was measly, at best. It appears that things have gotten slightly better now, but still not enough to justify the £1.59 price tag. For £2.30 I can buy the 12" Basics pizza for £1 and Basics pepperoni for £1.29, and last for two meals.


It seems however that today's Basics pizzas were reduced to clear, so I happily bought one, dressed it up with what remained of my Basics Brie and some Basics herb mix, and popped the lot into the oven.


The pizza was left a little too long in the oven unfortunately, which would explain why it looks so dark in the picture. The pepperoni tastes exactly like the Basics Pepperoni you would find at the Deli meat aisle, and the cheese is somewhat like the Basics Grated Hard Cheese mentioned elsewhere in this blog. The base was alright, reminding me of the base found in deep pan frozen pizzas, without the thickness. Overall, not unpleasant to eat, but not value-for-money unless marked down for clearance.


Description
Price per UnitNo. of servingsTrade-up PremiumTrade-up Benefits
Pepperoni Pizza£1.591+£0.80Bigger pizza, choice of crust, bigger and more pepperoni.
Related Posts Plugin for WordPress, Blogger...